

Imagine you are an HR-Manager, and you would like to know which employees are likely to stay, and which might leave your company. Besides you would like to understand which factors contribute to leaving your company. You have gathered data in the past (well, in this case Kaggle simulated a dataset for you, but just imagine), and now you can start with this Predict Employee Leave Hands-On Lab to build your prediction model to see if that can help you.
In this lab, you will learn how to create a machine learning module with Azure Machine Learning Studio that predicts whether an employee will stay or leave your company. We are aware of the limitations of the dataset but the objective of this hands-on lab is to inspire you to explore the possibilities of using machine learning for your own research, and not to build the next HR-solution.
Note: this workshop is to get in touch with machine learning. We won’t pretend to build an excellent model in 1 hour. In the real world you would have to do a lot more, but this workshop does give you an idea about the steps, with the free option of the Microsoft Azure Machine Learning Studio (classic).
Predict Employee Leave – Steps to build the model
You will follow several steps to explore the data and build a machine learning model to predict whether an employee will leave or not, and why. Every step will be eleborated further on.
- Step 1: Get the starting experiment
- Step 2: Get a first understanding of the data
- Step 3: Prepare a training and a test set
- Step 4: Train the model
- Step 5: Score the test set
- Step 6: Evaluate the results
- Step 7: Gain insights on the why
- Step 8: Publish your model
- Step 9: Deploy your model as a web service
- Step 10: Test your model
Note: The pictures are not very sharp, but you can download the pdf version of this workshop here to get a better view.
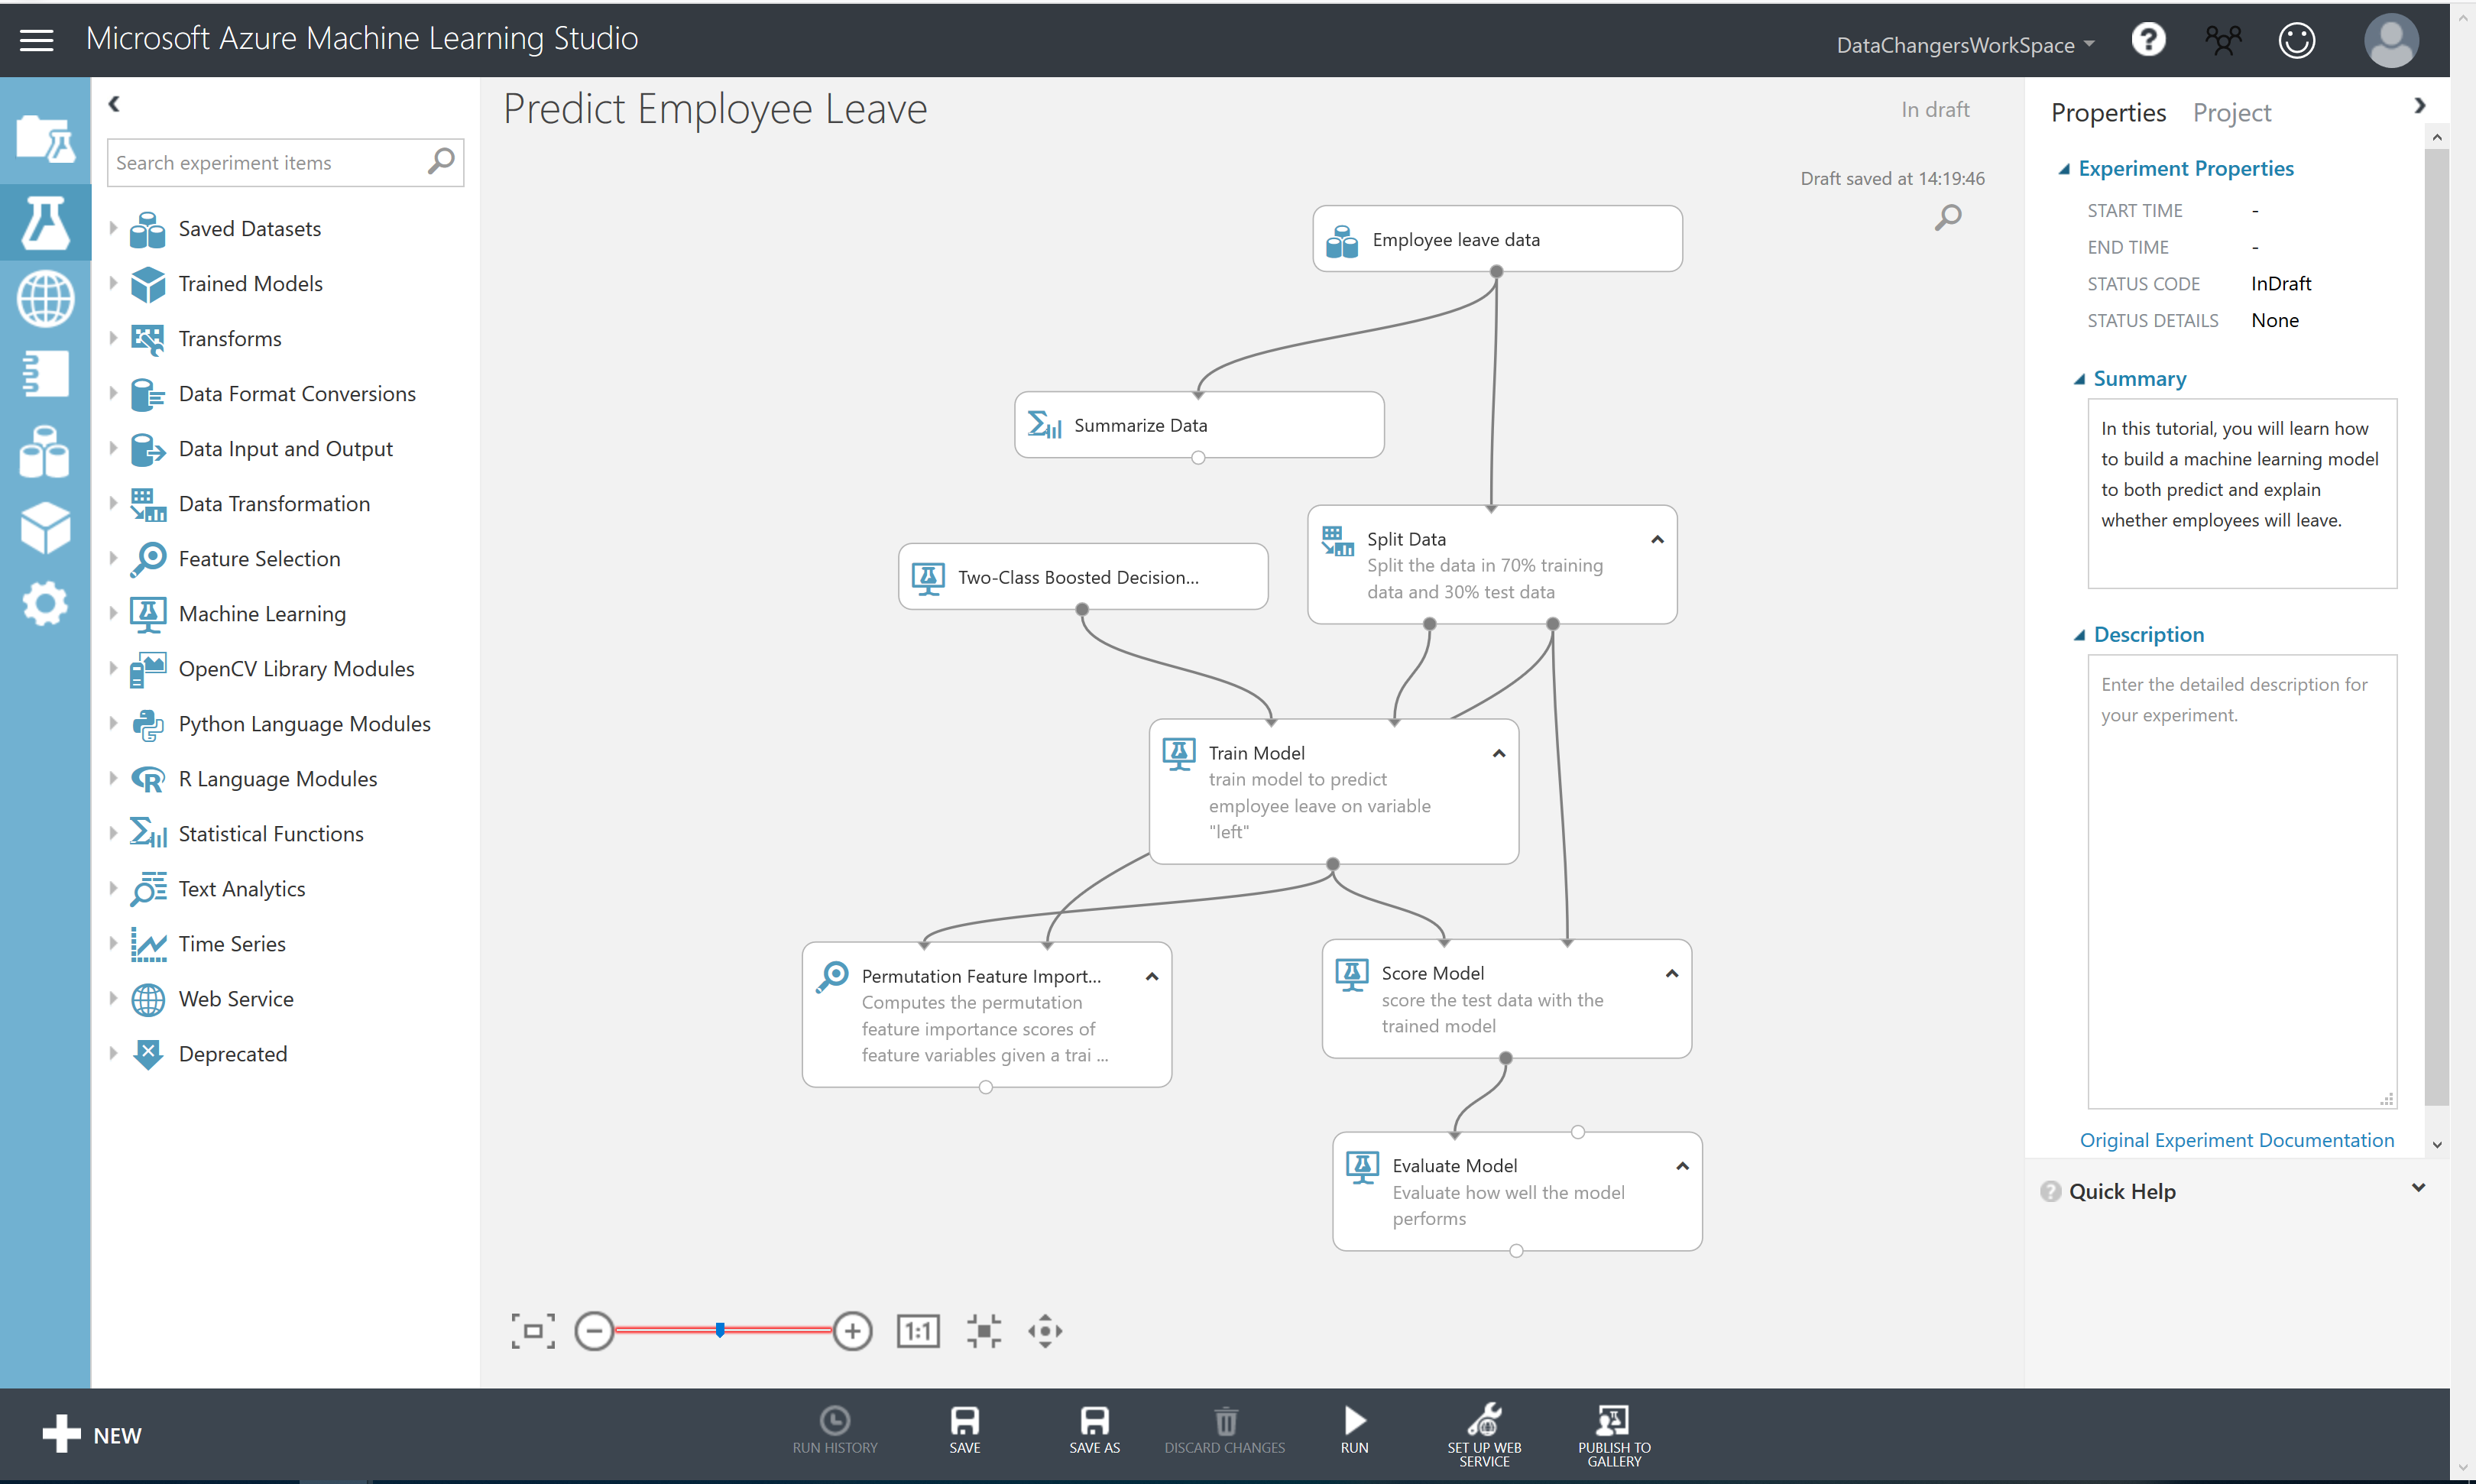
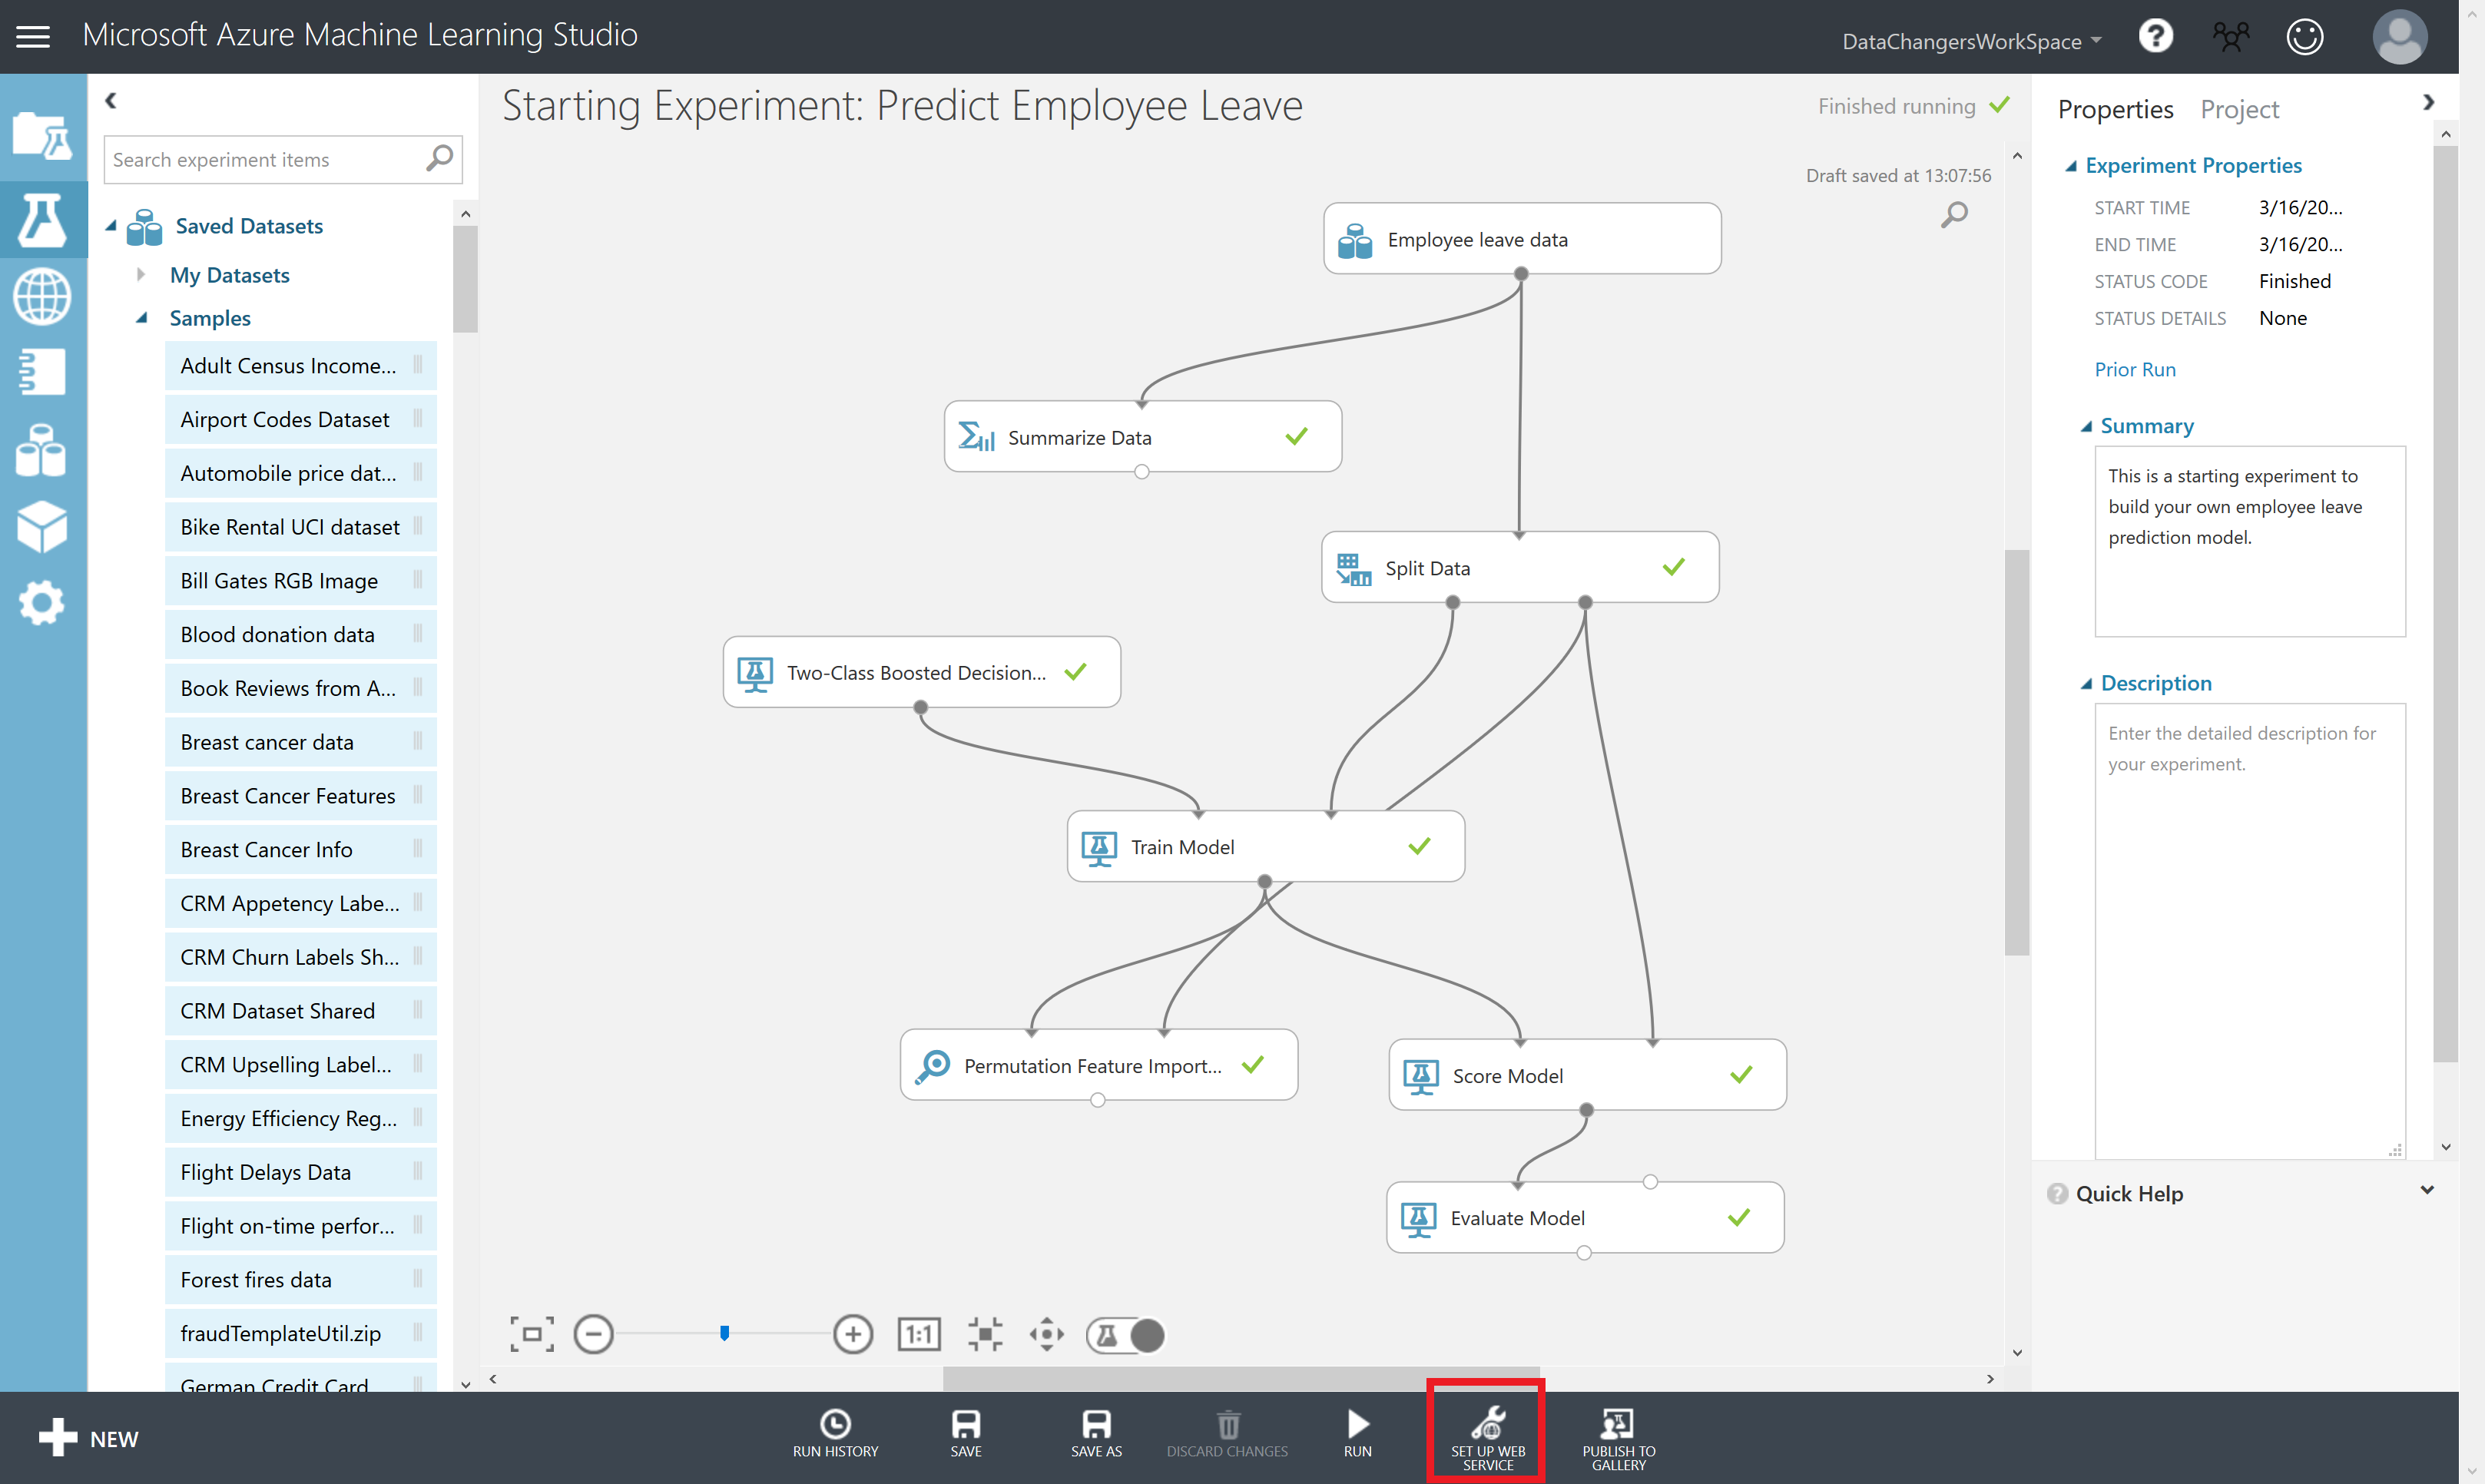
You will build this prediction model with the Azure Machine Learning Studio. The complete model will look like this:
Prerequisites: Get Access to Azure Machine Learning Studio
Go to https://studio.azureml.net/ and select Sign up here for Azure ML Studio.
You will need a Windows LiveID to sign in. If you don’t have one, you can sign up here: https://signup.live.com/
Hereafter, you can select the Free Workspace option:

Step 1: Get the starting experiment
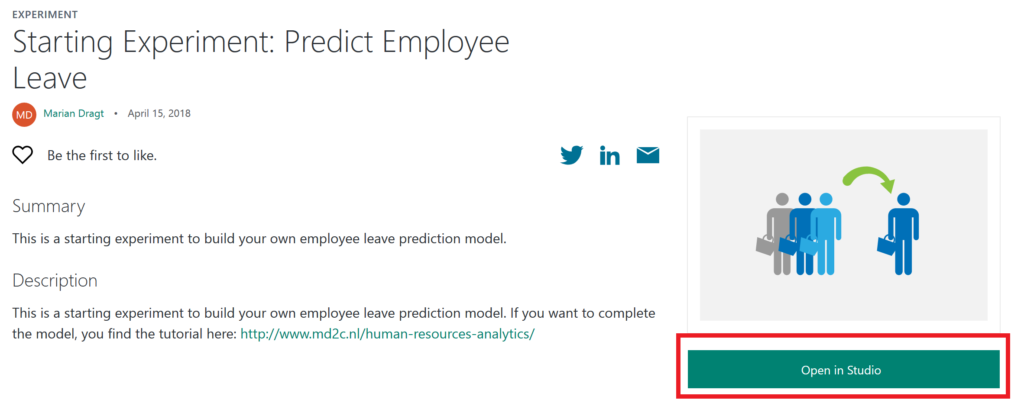
We created a starting experiment for you on the Azure AI Gallery to give you a smooth start.
Click HERE to open the starting experiment.
This experiment uses a simulated dataset from Kaggle. You have to open the experiment in your studio by clicking on the green button “Open in Studio”. This will open the Azure Machine Learning Studio in a browser, and you can copy the experiment to your free workspace.
Step 2: Inspecting the data
In the Starting experiment: Predict Employee Leave experiment, you will find the Employee Leave data on the canvas, together with a Summarize Data module.
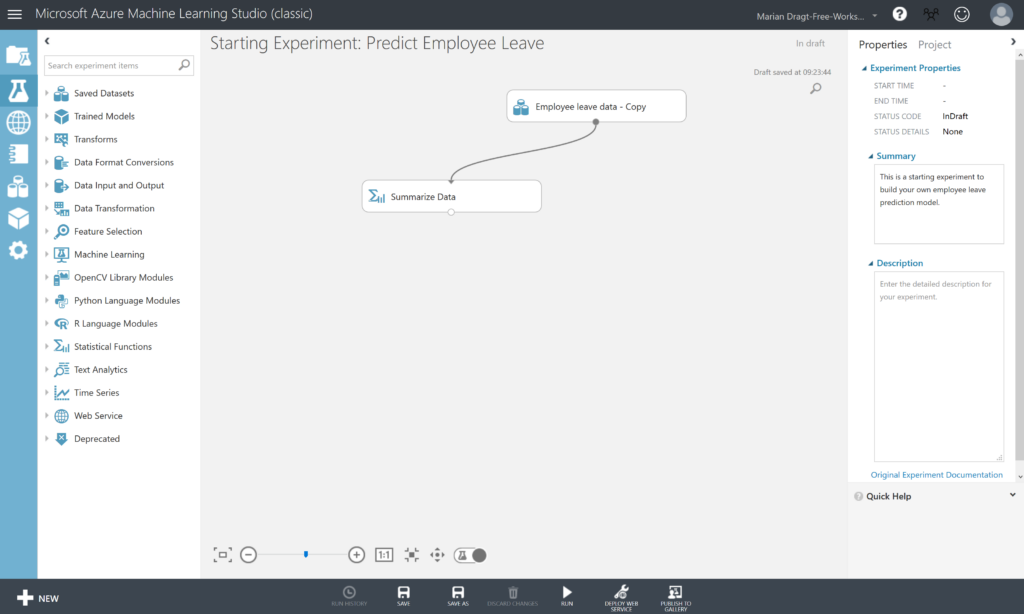
If you look at the top corner right, you can see that the experiment is “in draft”. This means that it hasn’t been saved, nor that it has been executed before. Therefore, we start with running the experiment, by clicking on the RUN button in the menu at the bottom. After running the experiment, the top corner message will change into “Finished running”, and we can start inspecting our data.
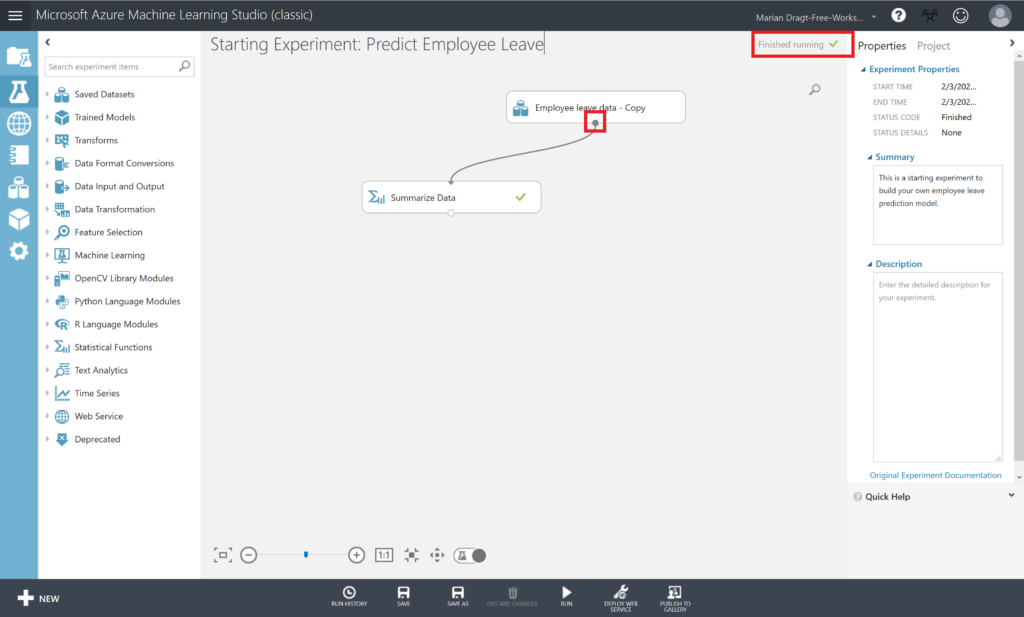
To get a first impression of the data, you can right-click the output port of the dataset and select “Visualize” from the menu to visualize the data. The output port is the little circle under every module on the canvas.
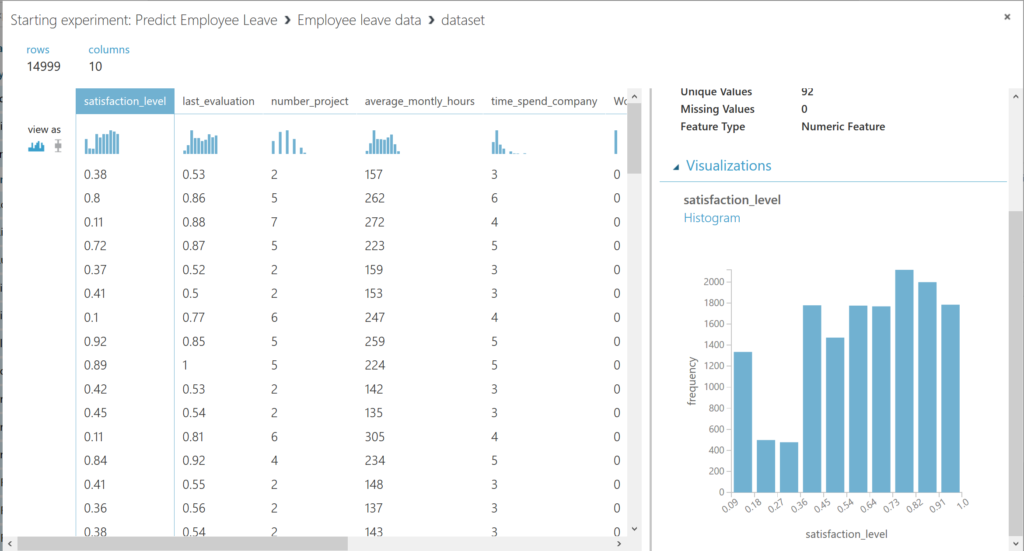
You can scroll through the different columns, and by selecting them, you get an overview in the panel on the right.
We can continue inspecting the dataset. The data comprise a wide range of topics which allow to explain employees’ leave behavior in relation with A) organizational factors (department); B) employment relational factors (i.e. tenure, the number of projects participated in; the average working hours per month; objective career development; salary); and C) job-related factors (performance evaluation; involvement in workplace accidents).
We have the following available variables in the dataset:
Organizational factors
- Department
Employment relational factors
- Time spent at the company
- Number of projects
- Average monthly hours
- Salary
- Whether they have had a promotion in the last 5 years
Job-related factors
- Last evaluation
- Whether they have had a work accident
Dependent variable
- Whether the employee has left
Another way to get a first impression of the data. Therefore, we use the Summarize Data module, which gives us insights about the data.
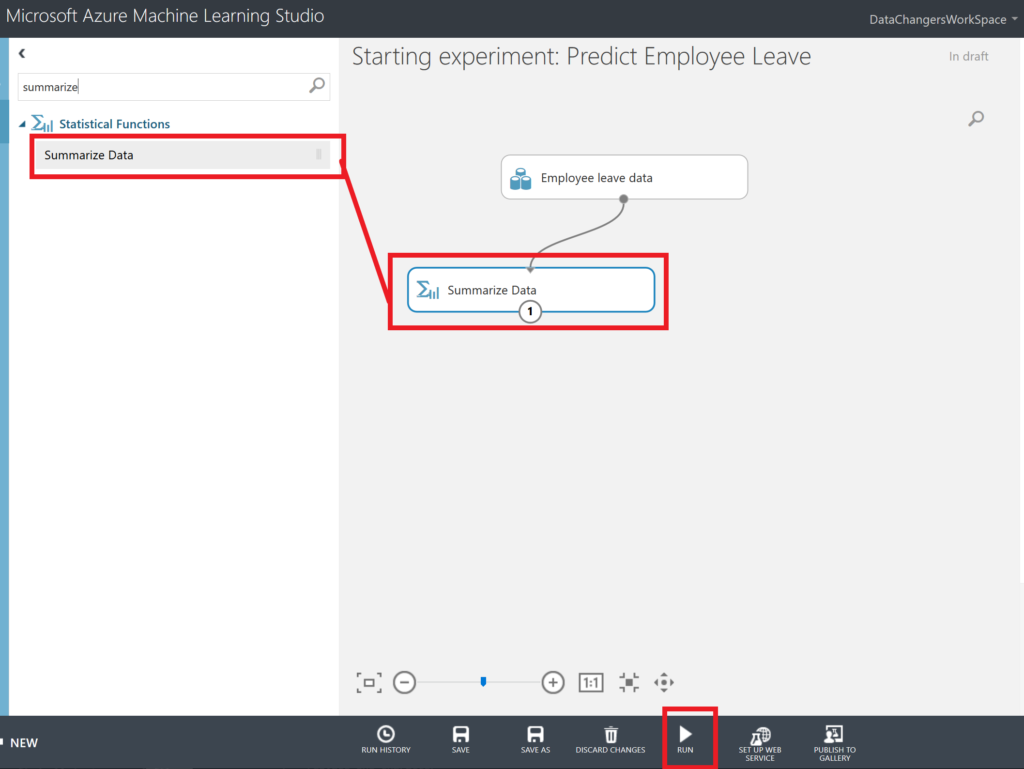
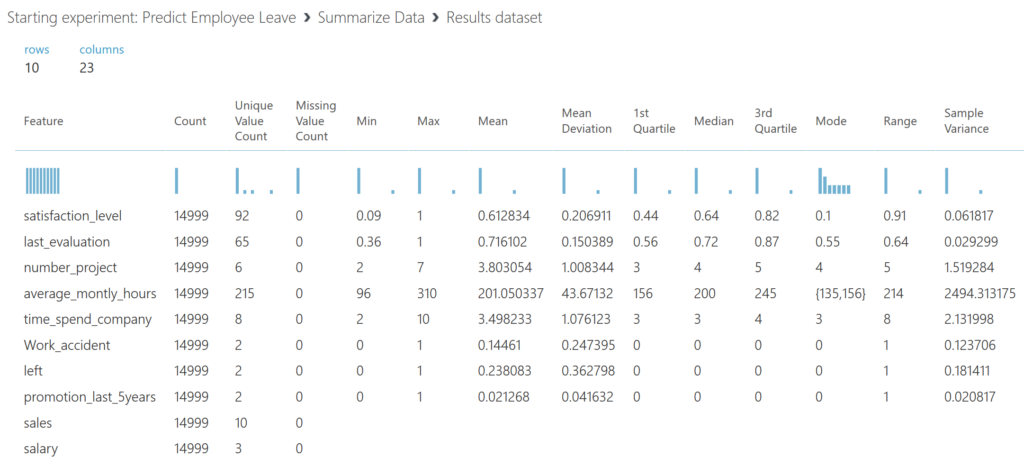
After you ran the model, you can right-click on the output port of the Summarize Data module and select Visualize. We see that we have 14999 observations, and that we don’t miss any data. We also get an idea about the variance and distribution of the data.
Step 3: Prepare a training and a test set
We split the dataset into a training and a test set, using 70% of the data to train the model with, and 30% of the data to test the model later on. Therefore, we drag the Split Data module on the canvas. You can find this module in the menu left, next to the canvas. You can either click through the various options or use the search function.
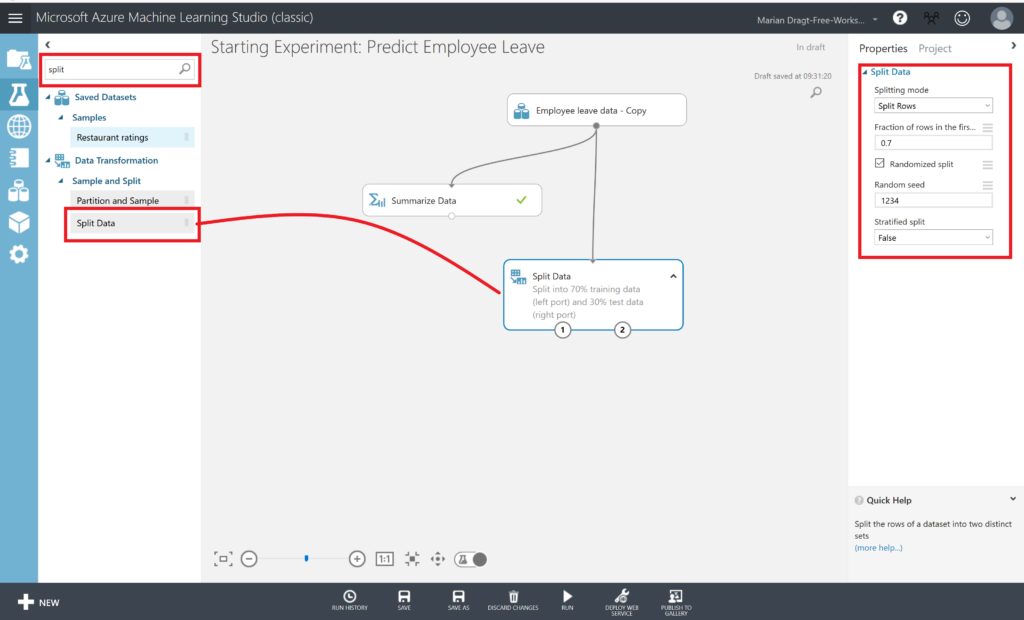
When you have found the Split Data module, you can drag it on the canvas, and connect the output port of the dataset to the input port of the Split Data module. You can connect the modules by left clicking on the output port, and keep you mouse button down while draging it to the module you want to connect it to. We set a seed, so we can repeat this experiment. Make sure you RUN the model after every step.
Step 4: Train the model
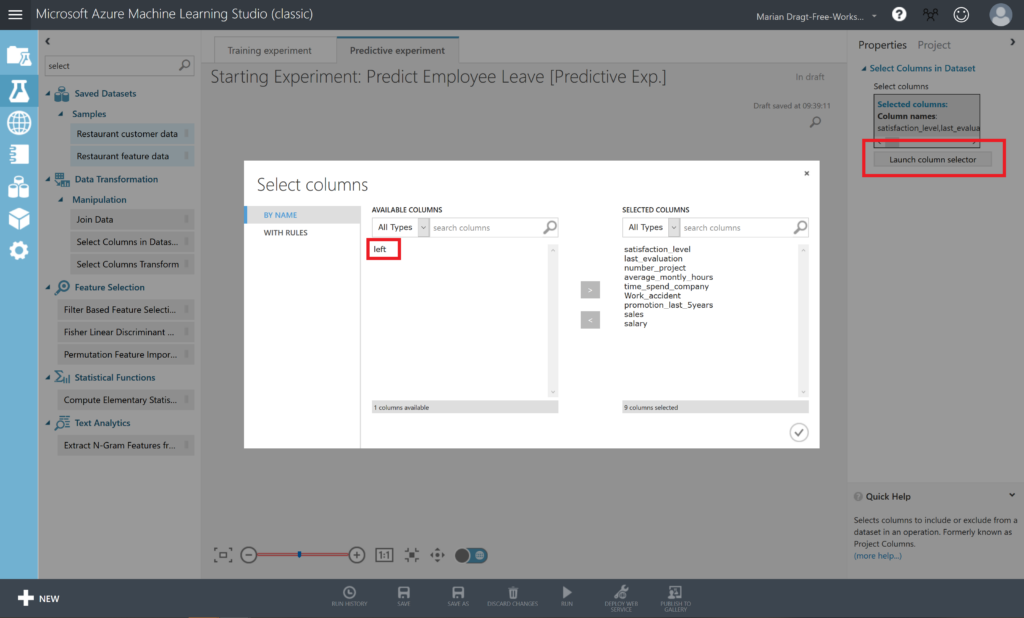
Since we have split the data, we can continue to work with the training data set. We first select the Train model module and drag it on the canvas. But when we do so you will a little red exclamation mark. This is because we haven’t selected the variable that we want to predict, and we haven’t defined the algorithm that we want to use to train the model with. First, we will select the dependent variable. Therefore, we have to click on the Launch column selector.

In order to set the dependent variable, we select the variable “left” (indicating whether an employee has left or not) from AVAILABLE COLUMNS and use the arrow button to get it to the right side, under “SELECTED COLUMNS”.

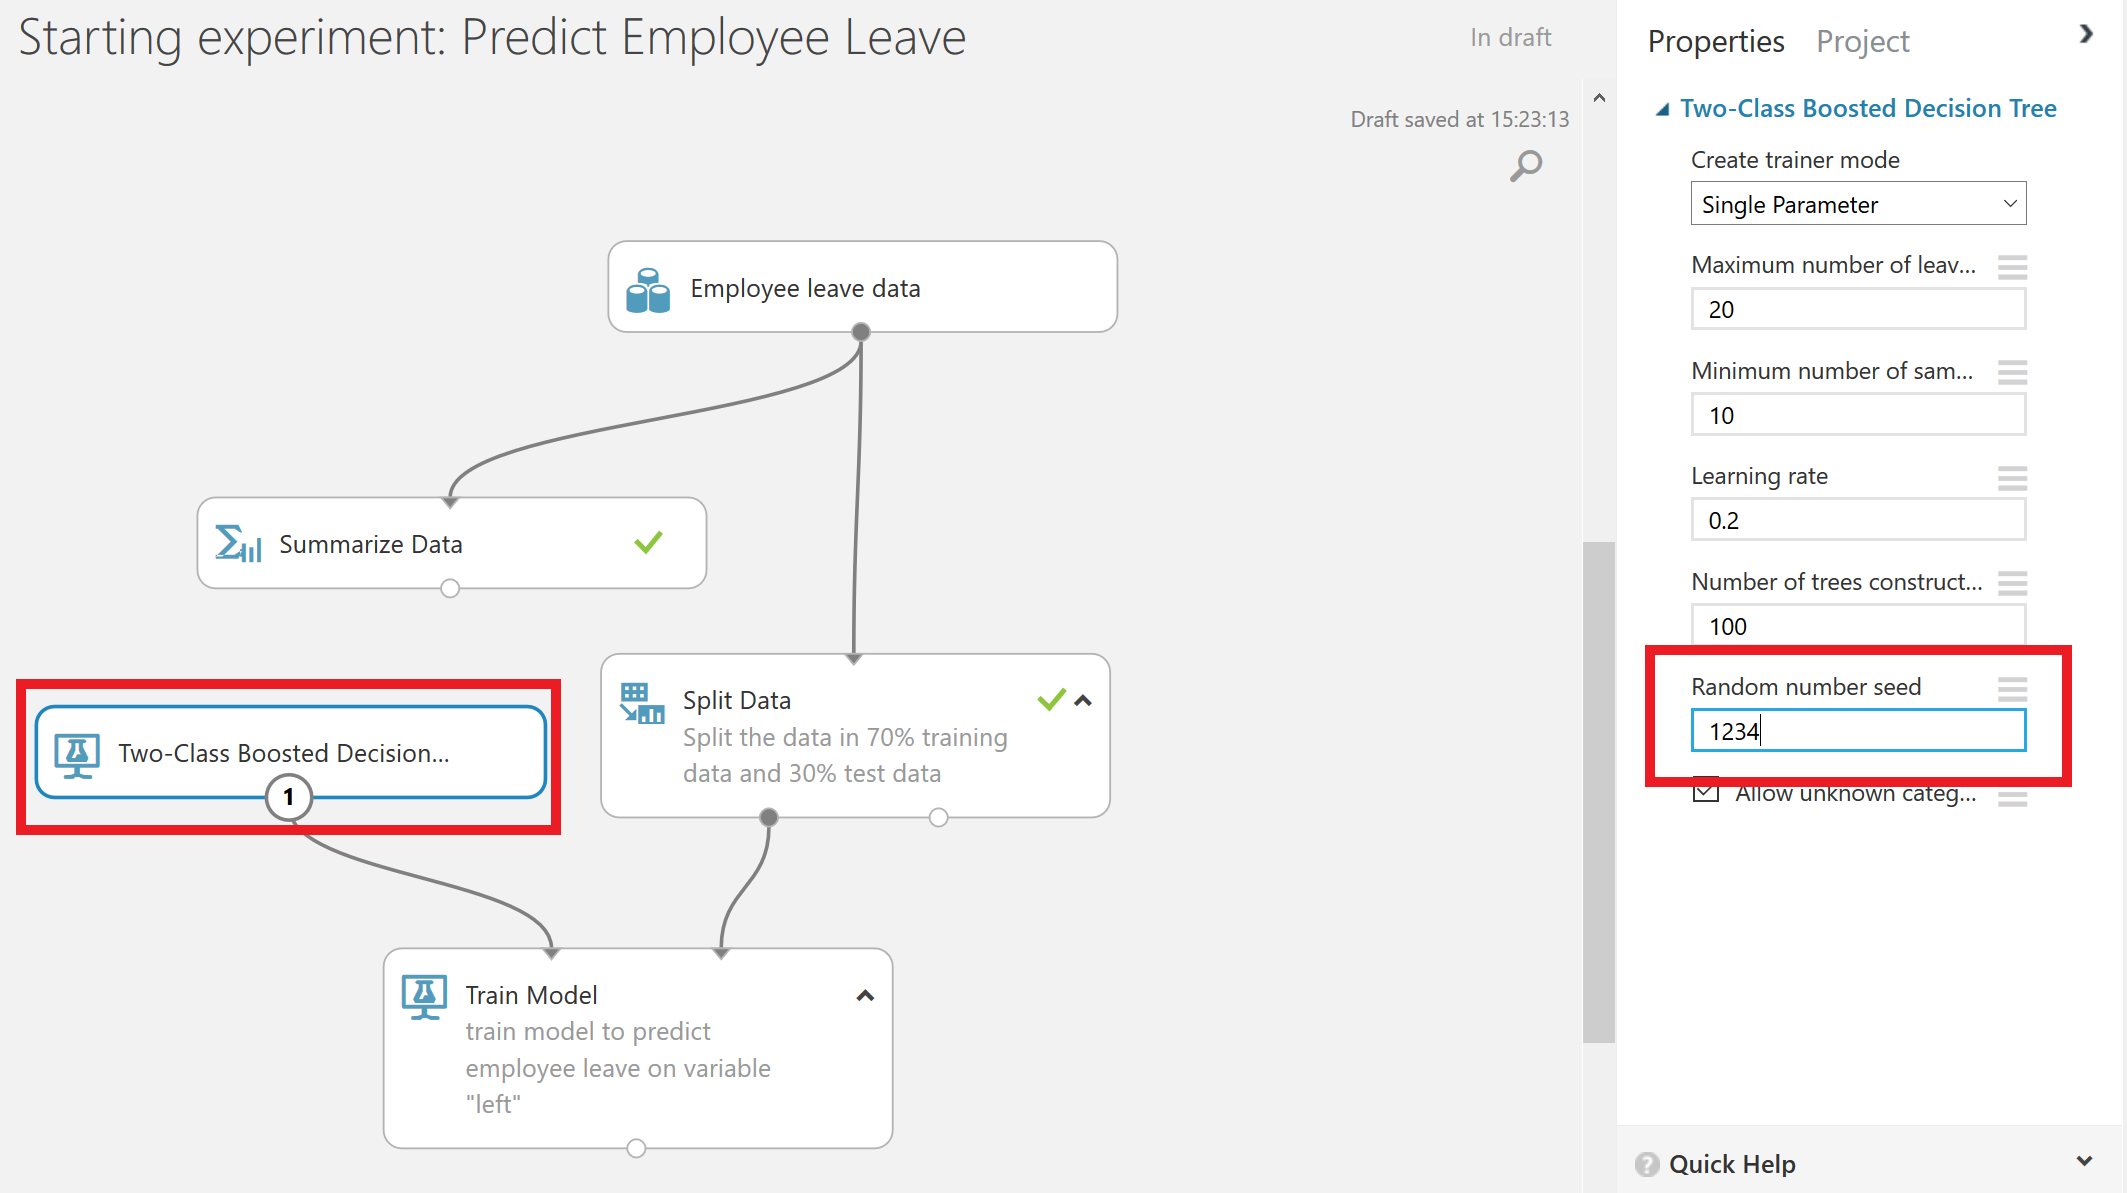
Furthermore, we have to select the algorithm to train the model with. In this experiment we use the Two-Class Boosted Decision Tree algorithm with the standard parametrization. We do add a seed to make this experiment replicable.
Step 5: Score the test set
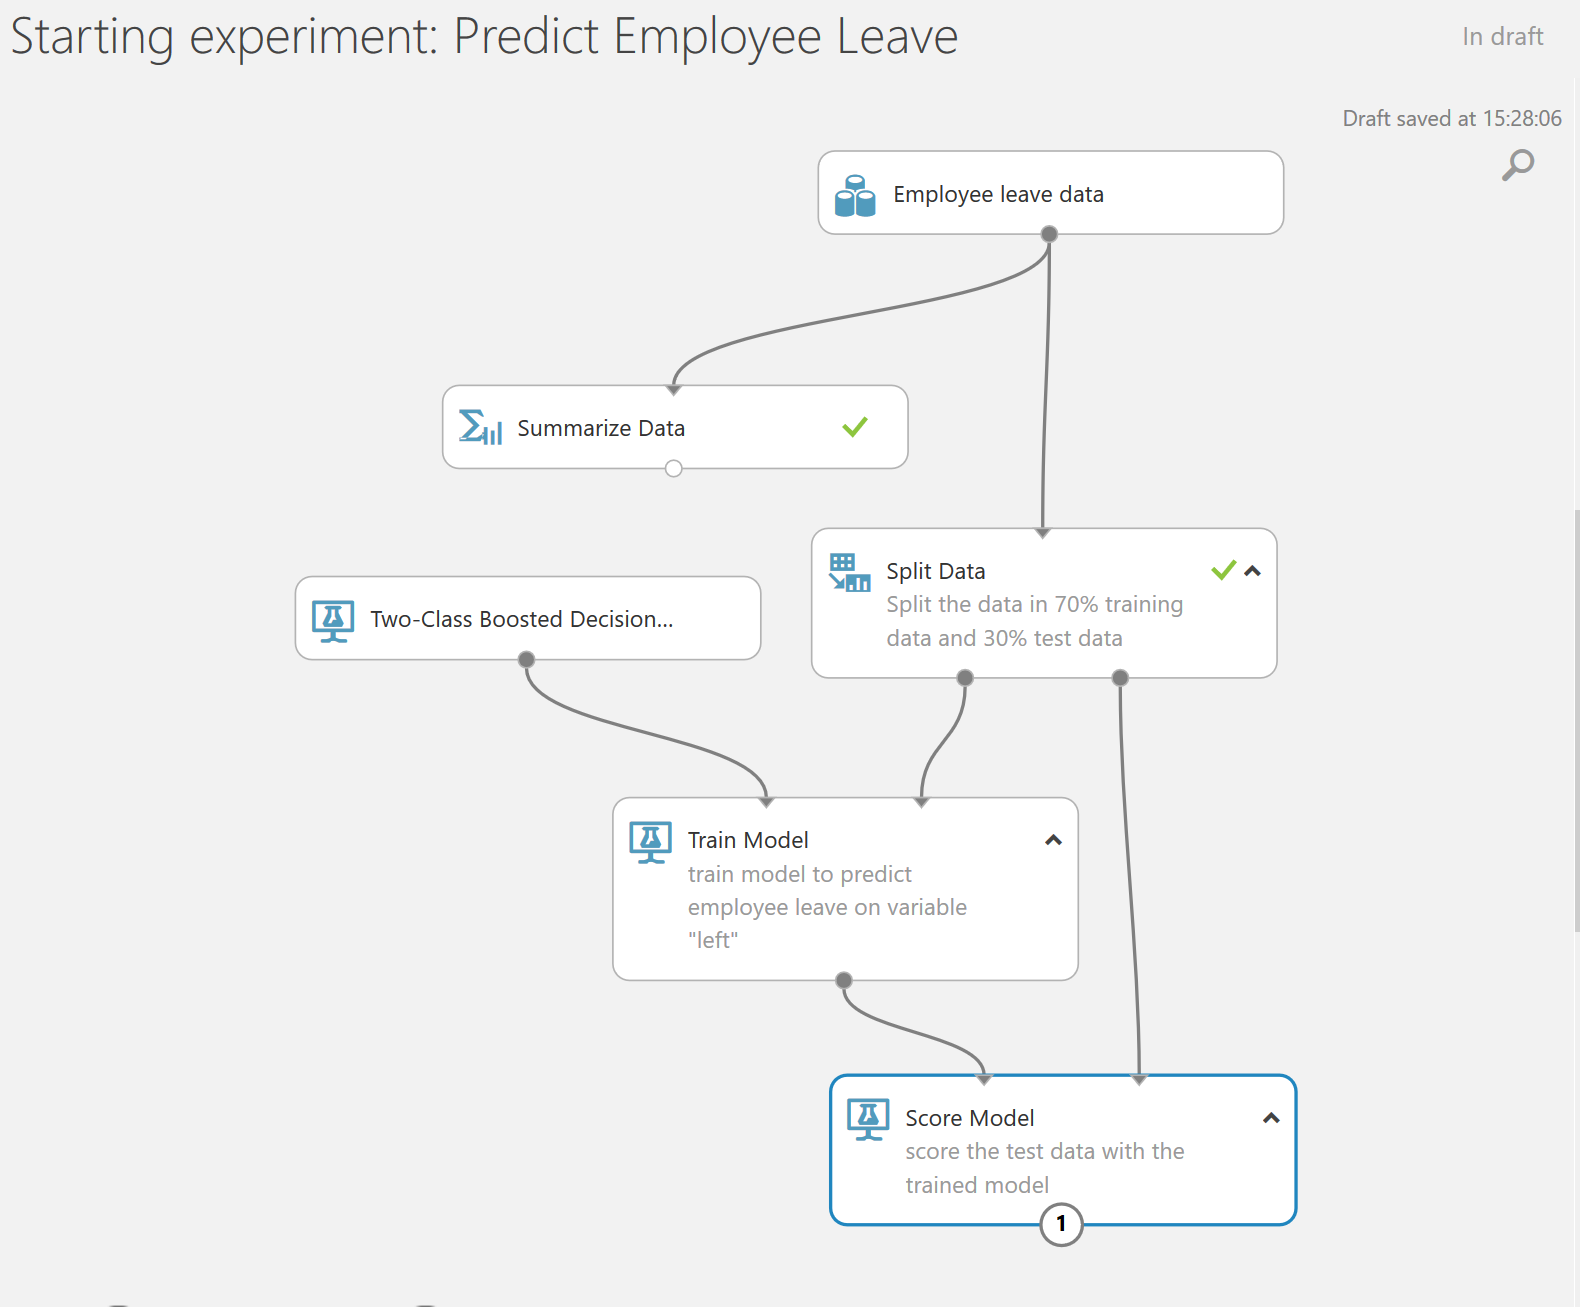
After this, we are prepared to score the test set and see how our model performs. Therefore, we use the Score Model module and we connect both the output port of the Train model module, which contains the trained model, as the outcome of the Split Data set, containing the test data.
Step 6: Evaluate the results
Finally, it’s time to evaluate the results of our model. We use the Evaluate Model module which we connect to the results of our prior scoring.

Let’s run the model, and then right click on the Evaluate Model module to visualize the results. We can predict with 98% accuracy and 98% precision.

Step 7: Gain insights on the why
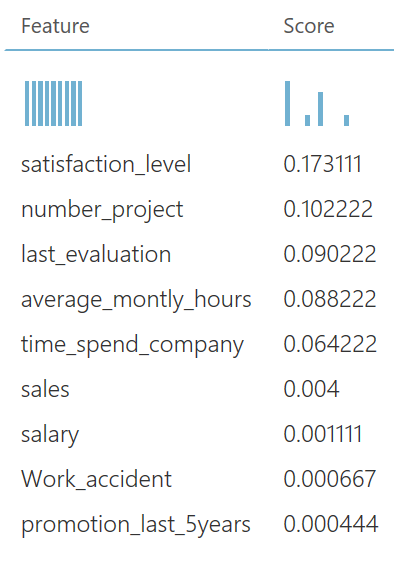
Our final question was why employees were leaving. Therefore, we could add the Permutation Feature Importance module. We connect the output port of the Train Model module and the output port of the Split Data module. Now we can compute the permutation feature importance scores of feature variables given this trained model and the test dataset. We set a seed to make the experiment replicable, and we focus on accuracy, meaning that we are both interested in selected correctly the people that leave, and the people that will not leave.
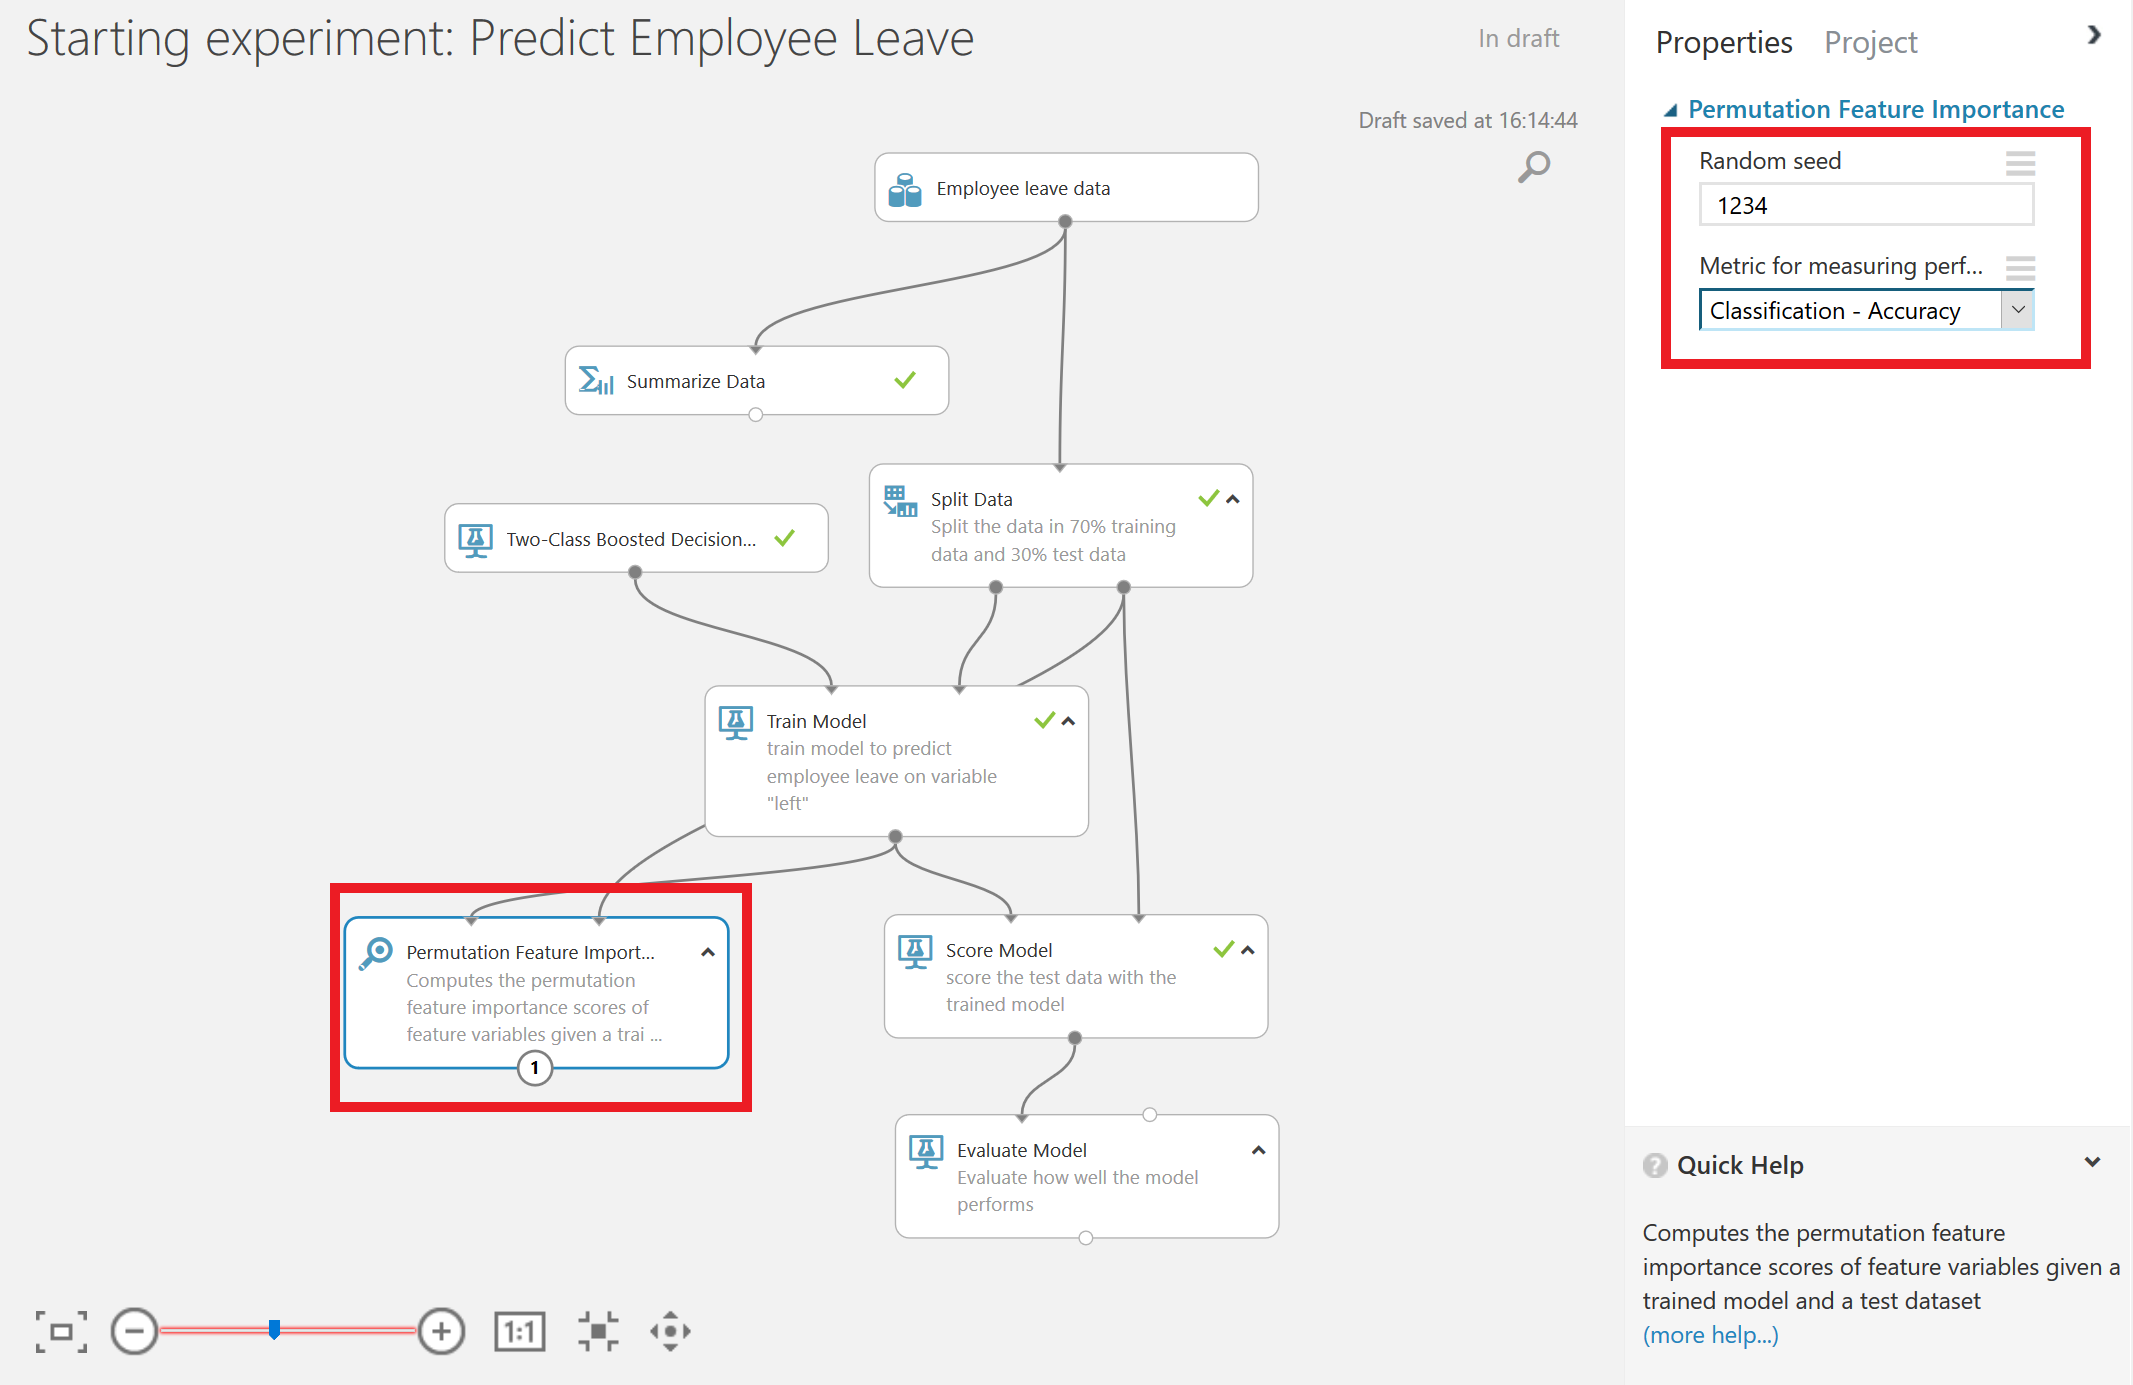
If we run the model, and right-click on the output port of the Permutation Feature Importance module, we find that satisfaction was one of the main factors when leaving, according to this dataset. Next to that, the number of projects an employee got was important.
Step 8: Publish your Model
Publish the Model as a Web Service
Make sure you have saved and ran the experiment. With the Starting experiment: Predict Employee Leave experiment open, click the SET UP WEB SERVICE icon at the bottom of the Azure ML Studio page and click Predictive Web Service [Recommended].
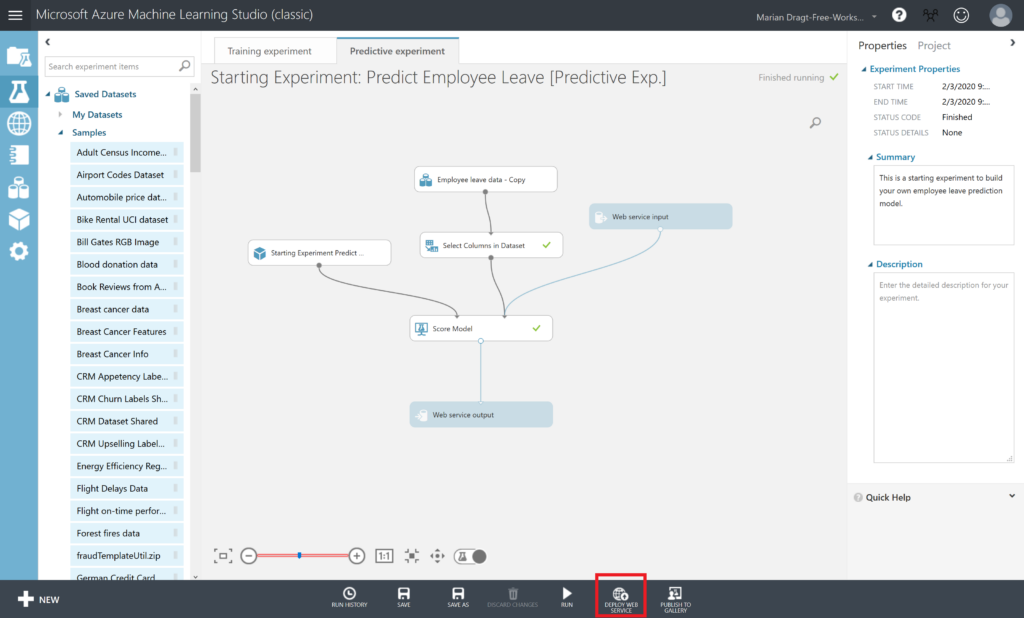
A new Predictive Experiment tab will be automatically created. Verify that, with a bit of rearranging, the Predictive Experiment resembles this figure:
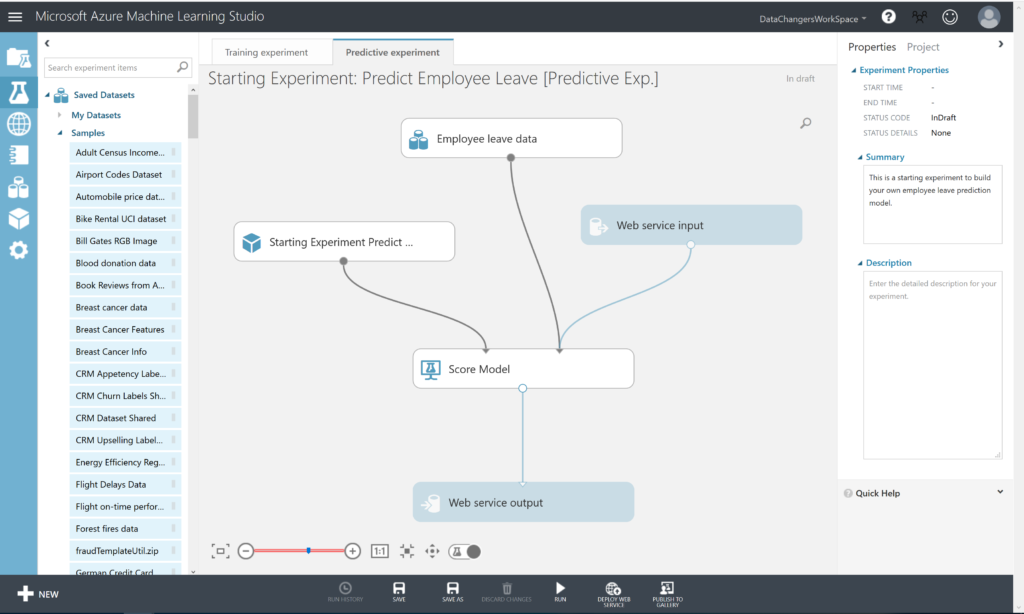
An important step to carry out now, is eliminating the dependent variable “left”. Because this is exactly what you want to predict and you can’t leave it as input variable, although it will be ignored by the model itself. In order to do so, select Select Columns in Dataset and put it between the dataset and the Score Model module.
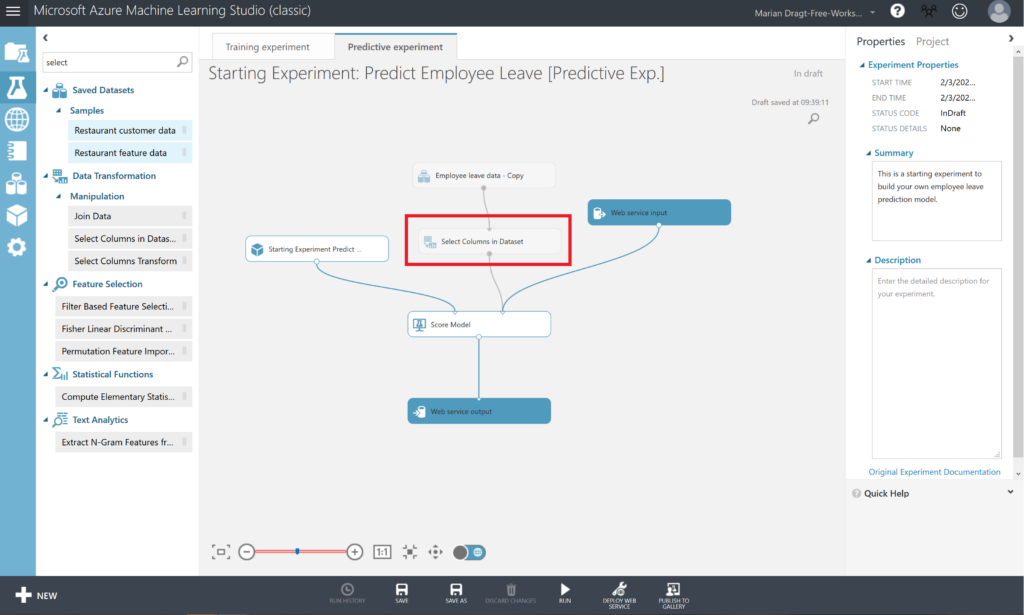
Select the Select Columns in Dataset module, open the Launch column selector, and remove the variable “left”. Now RUN the predictive experiment.
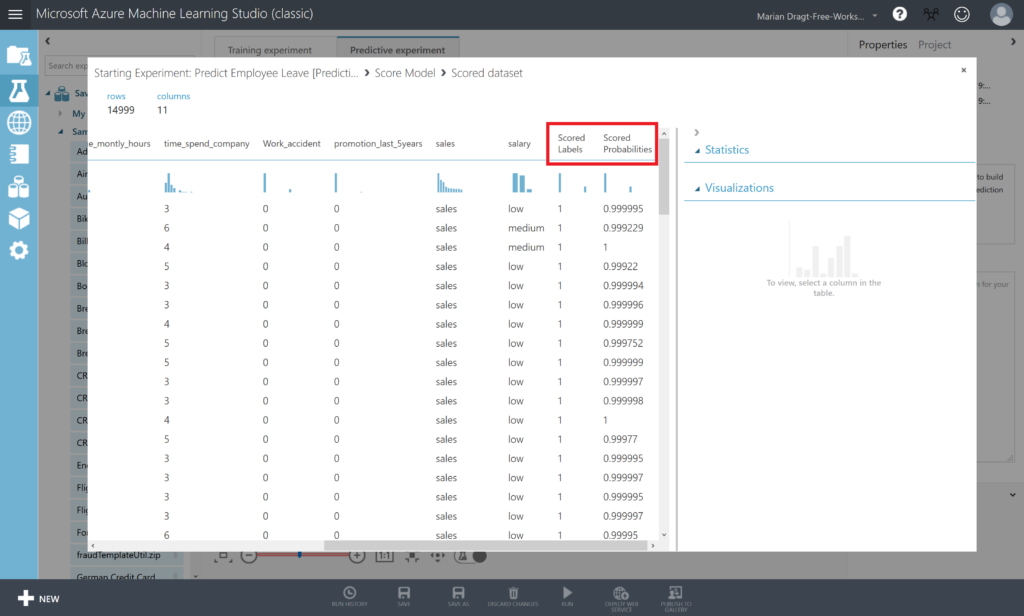
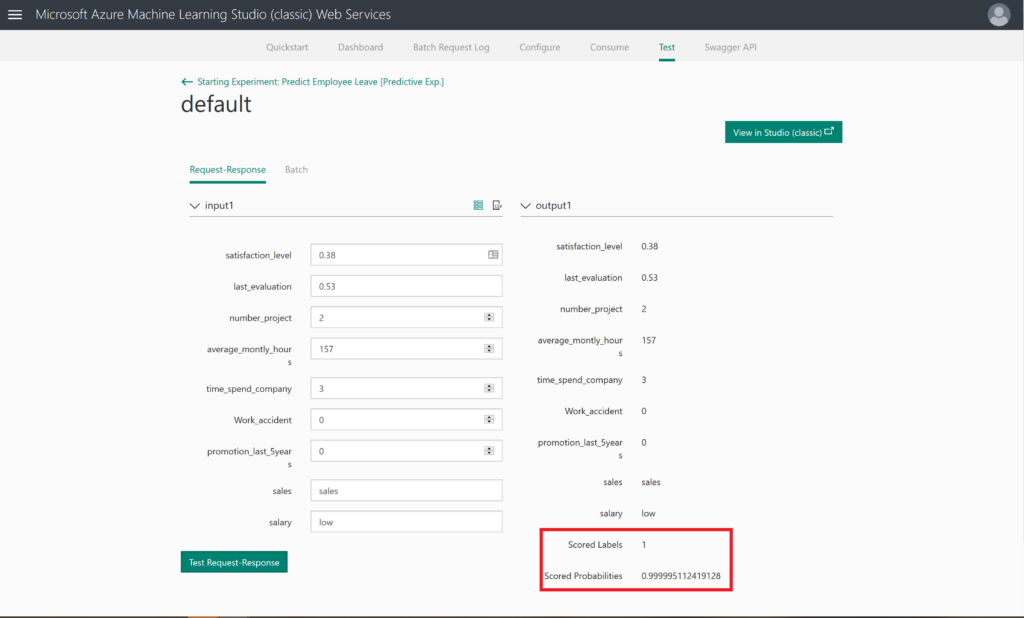
When you inspect the output of the Score Model module, by right-clicking on the output port and selecting Visualize, you will see that there are 2 extra columns in your dataset, named Scored Labels and Scored Probabilities. Scored Labels contains the prediction whether an employee will leave or not, and is based on the Scored Probabilities value, where 0.5 is the cut-off: from 0.5 an employee will leave.
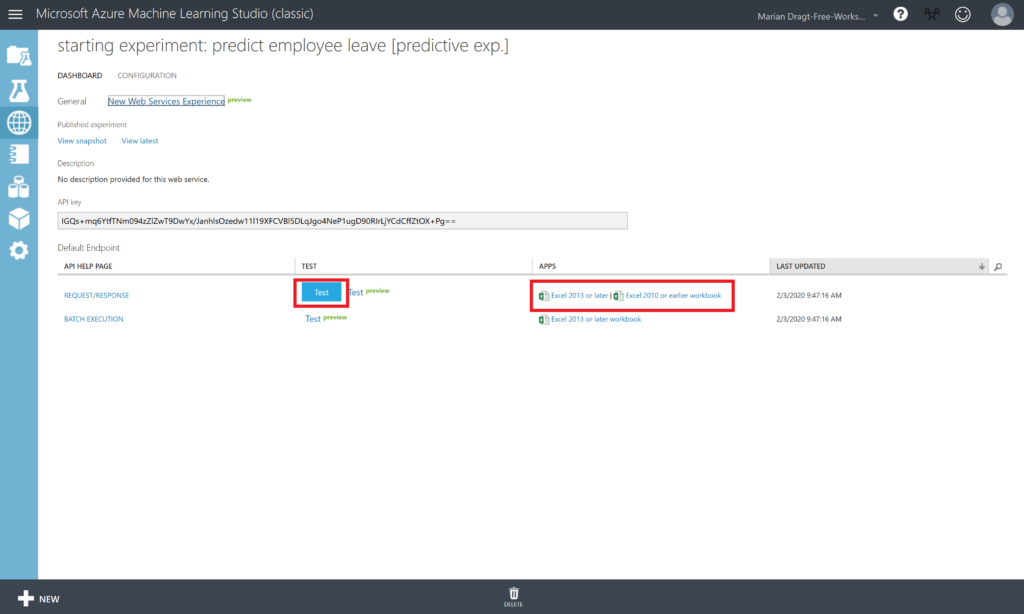
9: Deploy and Use the Web Service
In the Starting Experiment: Predict Employee Leave [Predictive Exp.] experiment, click the Deploy Web Service button at the bottom of the window.
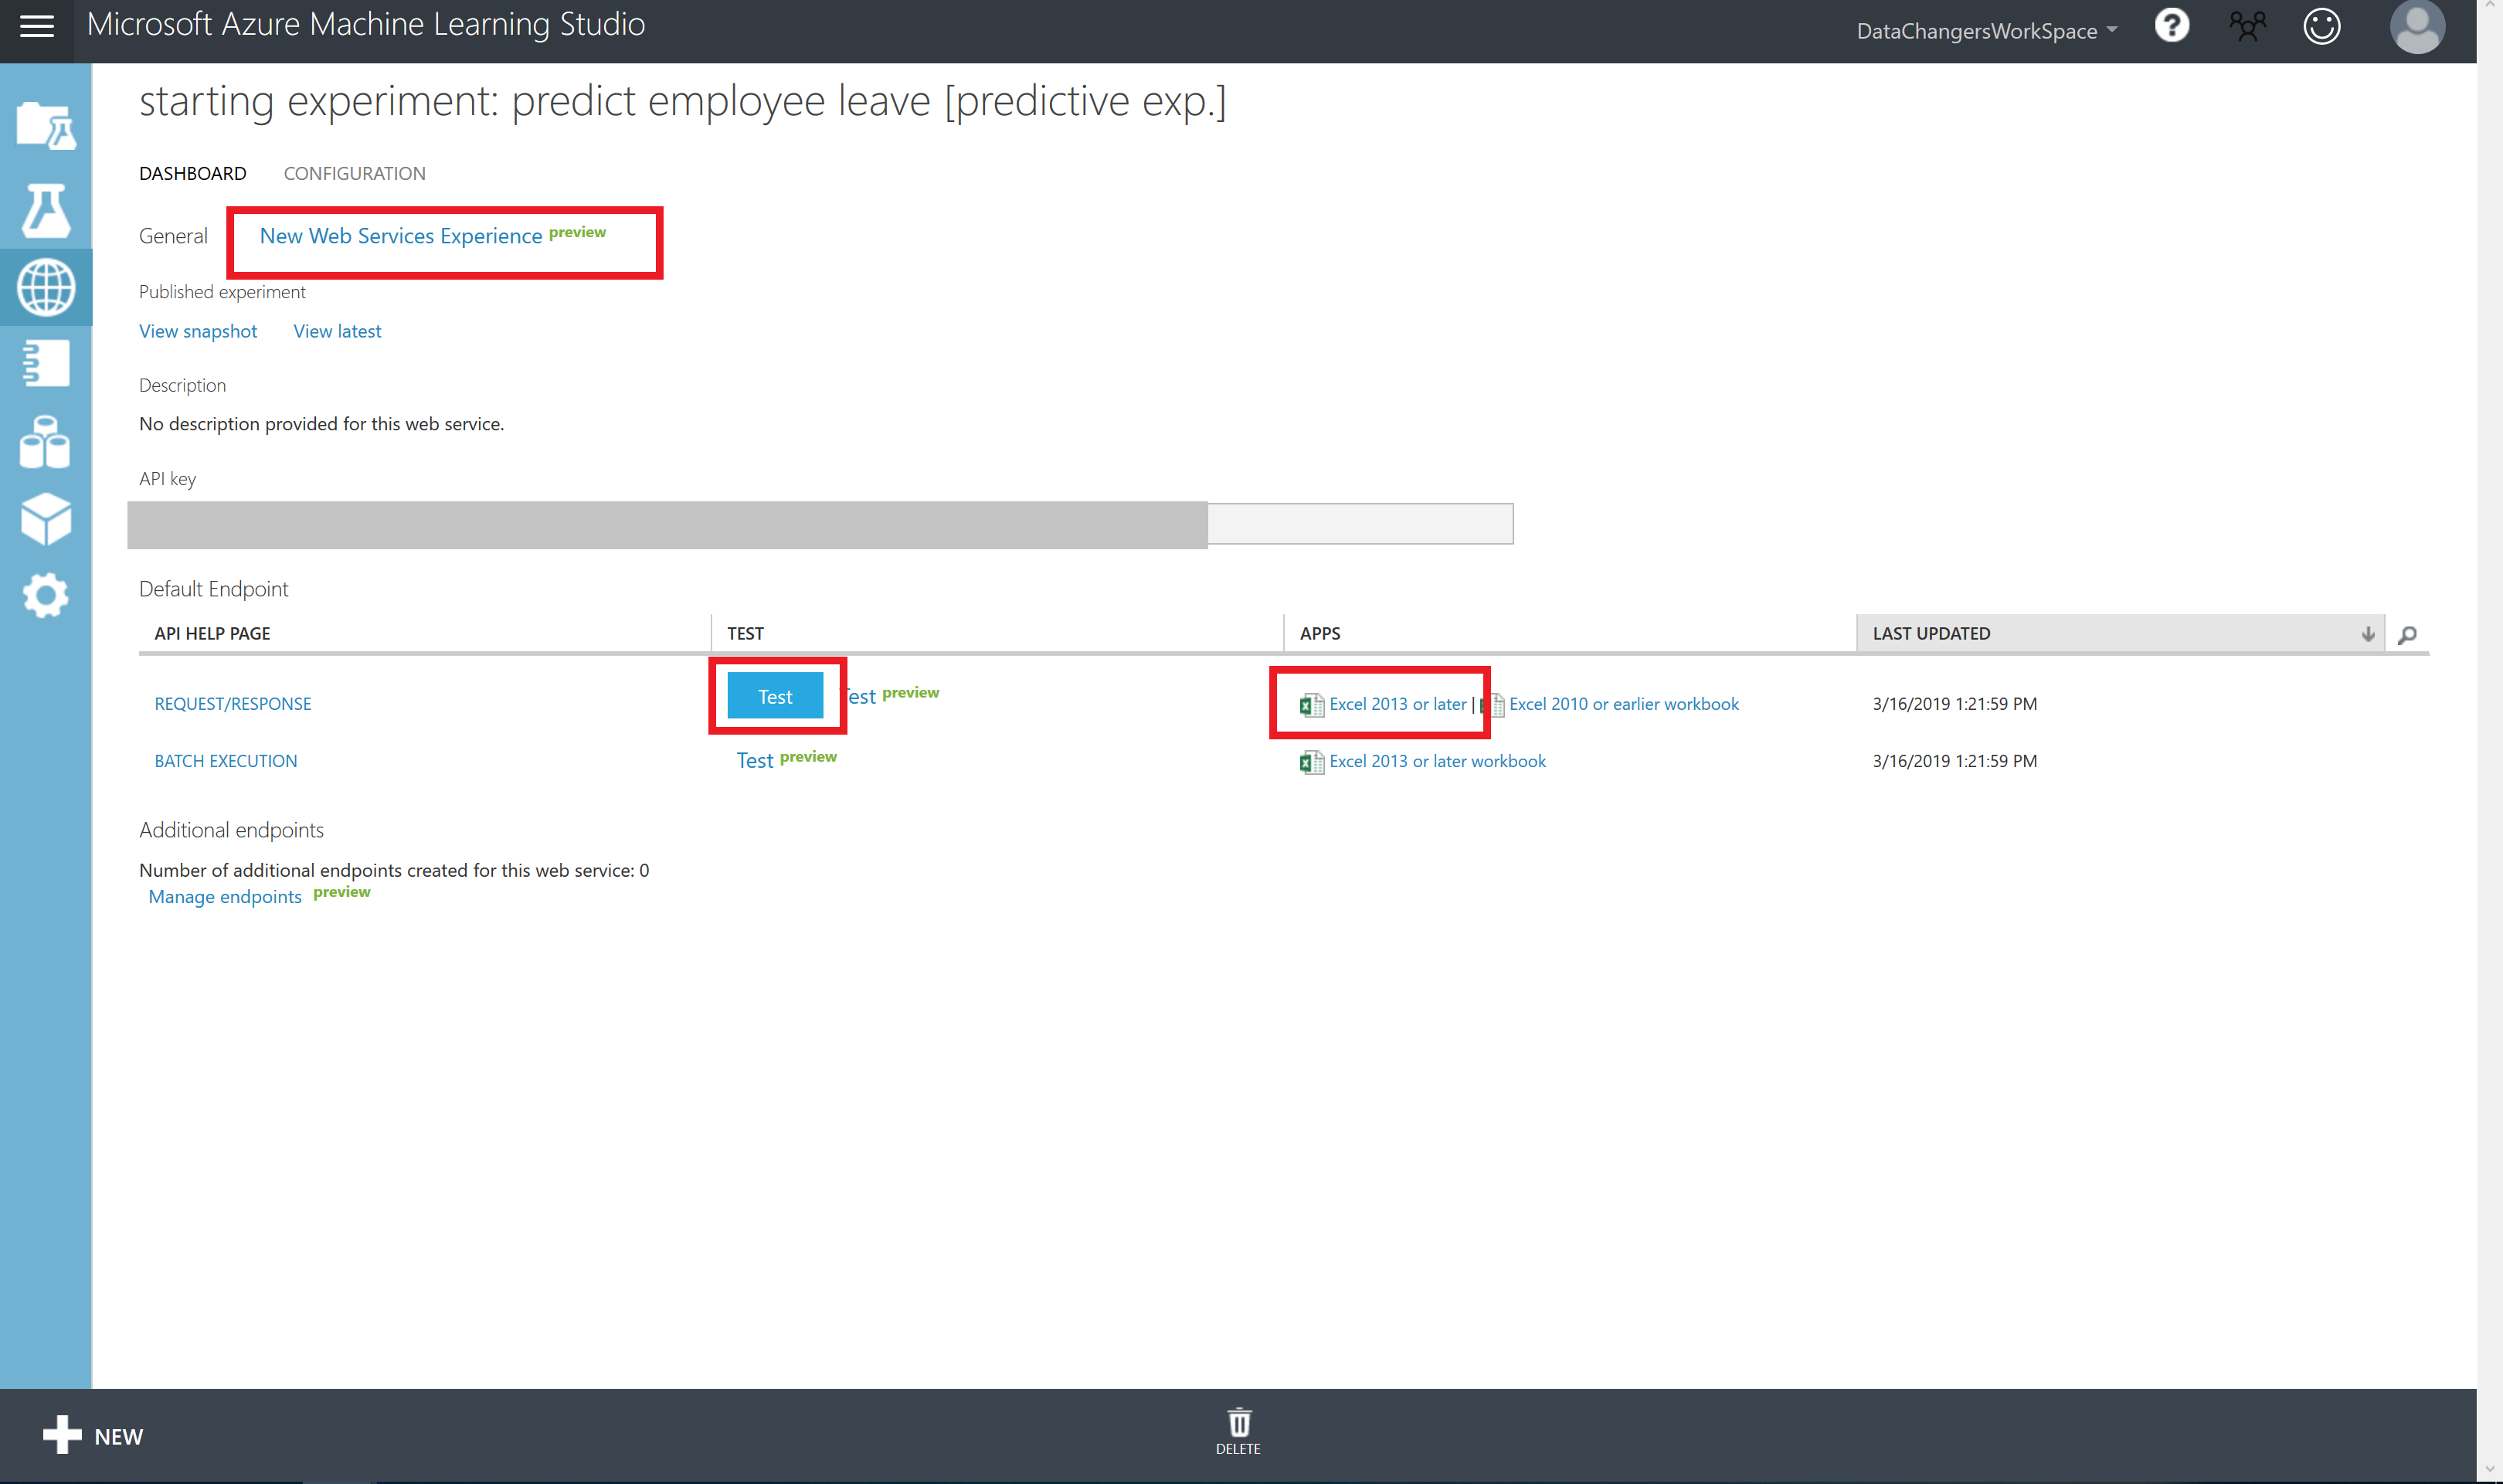
Wait a few seconds for the dashboard page to appear. You have several options to connect to the webservice.
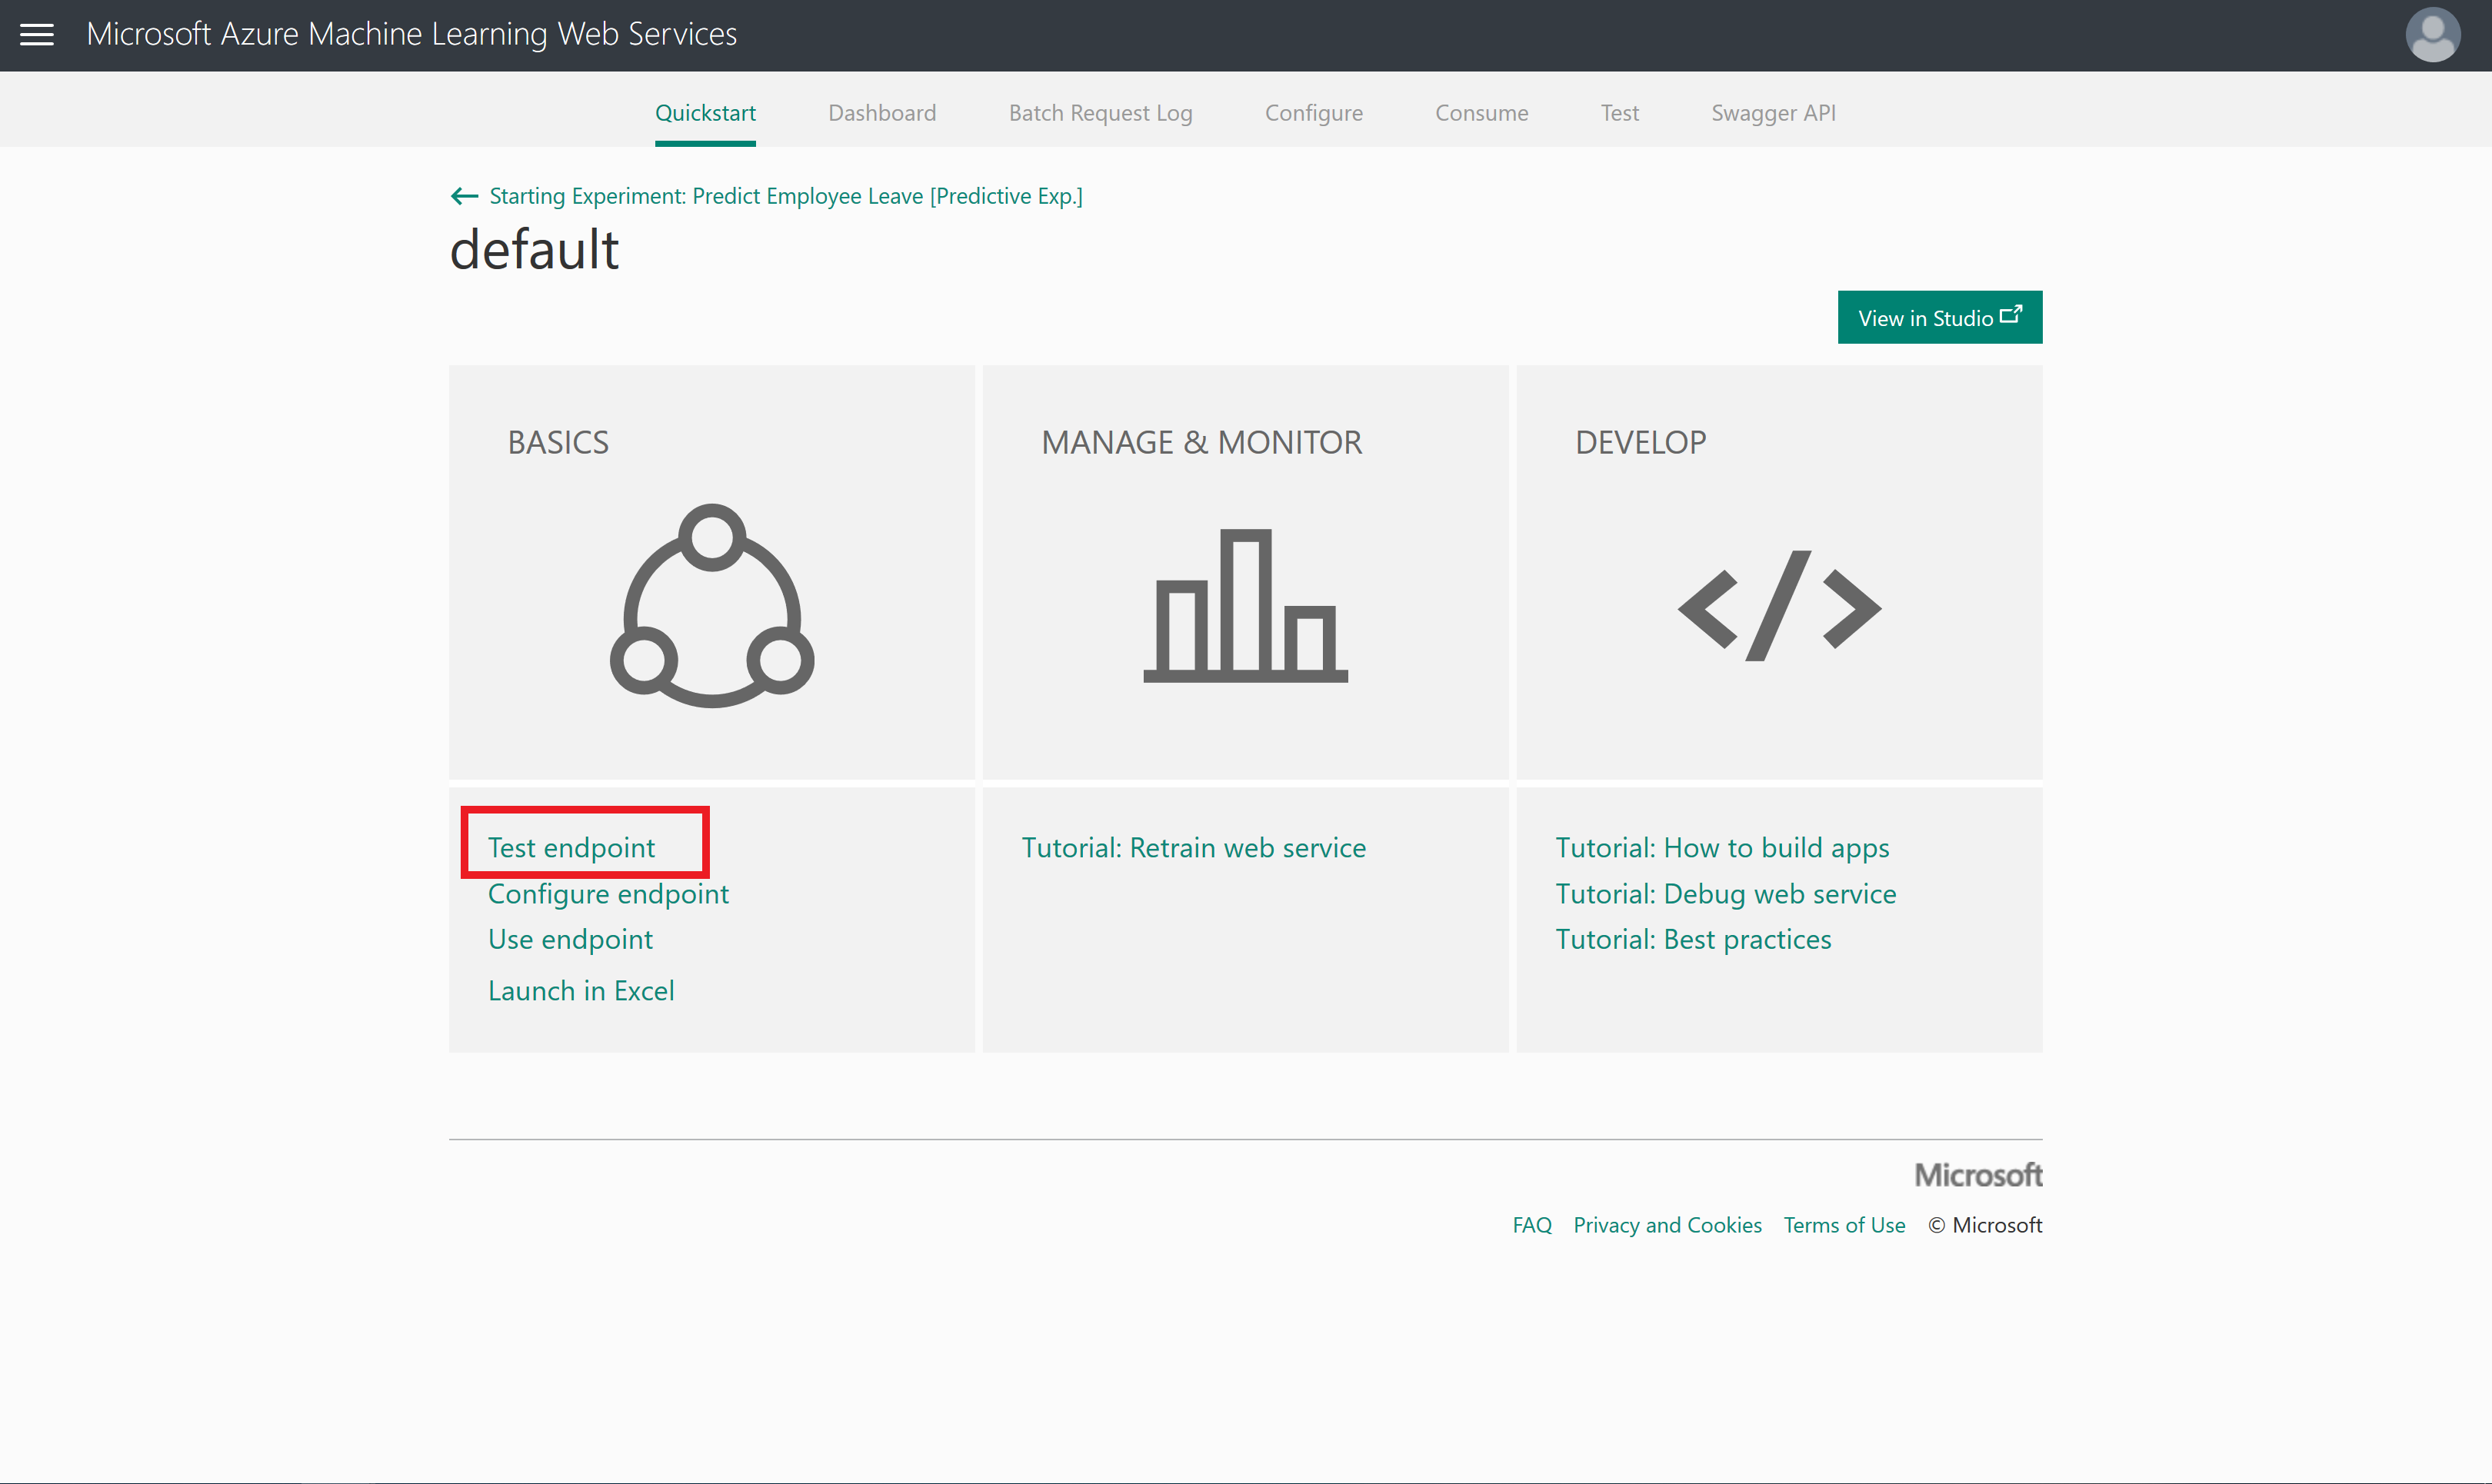
Step 10: Test your model
To test this webservice, you can i.e. click on New Web Services Experience (preview). This will open a new browser where you have the option to test your model (Test endpoint option under BASICS)
When clicking on Test endpoint, you have the option to enable the usage of sample data, which will generate a sample record to test your model with.
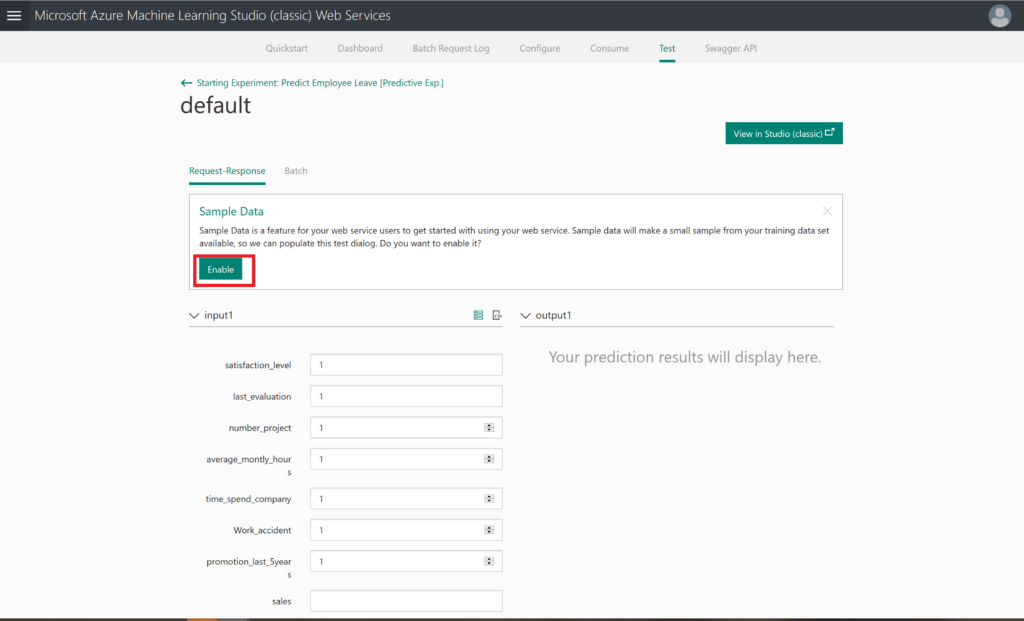
After enabling this sample data, you will see the generated sample data.
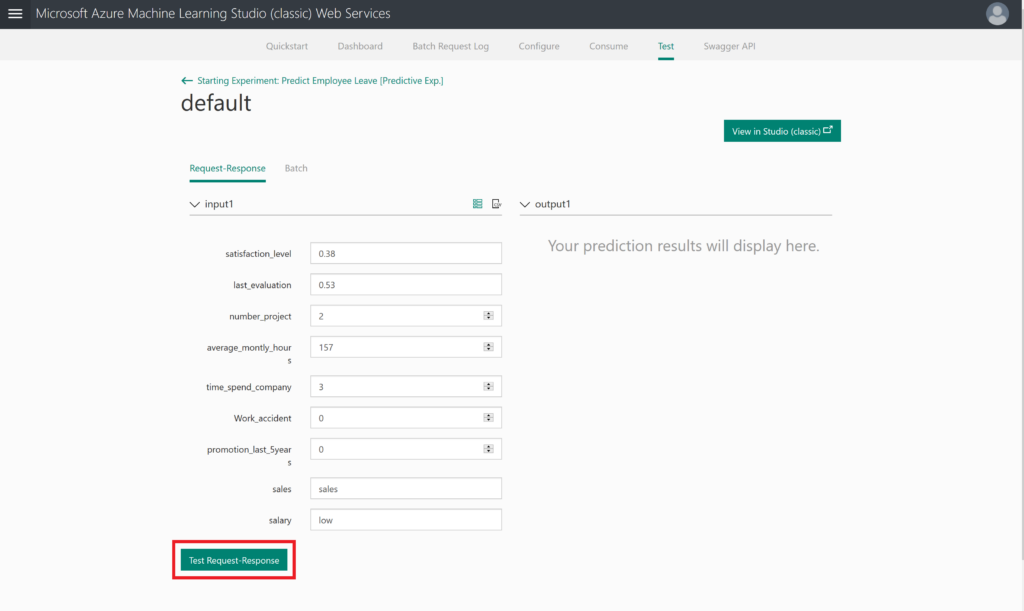
The final step would be pressing the Test Request-Response button: will this person leave the company?
If the webservice does not work, you can also use the option to click on the blue TEST button, or to launch an Excel file. It is up to you to explore these options now.
Summary Predict Employee Leave model
By completing this lab, you have prepared your environment and data, and built and deployed your own Azure Machine Learning model. We hope you enjoyed this introductory hands-on lab and that you will build many more machine learning solutions!
Limitations
Of course, there is much information missing. We don’t know anything about the dates of the obtained data, nor do we know anything between the data gathering and the moment that the employee left.
Inspiration
As mentioned before, this Predict Employee Leave hands-on lab is created to inspire you. If for whatever reason you were struggling to get the model built, you can also download the complete model from the Azure AI Gallery.
We hope you have enjoyed this workshop and hopefully it inspired you to build your own models. If you want to take your models into production, then please use another environment: https://ml.azure.com/
Here you can find a similar interface, called Designer, but with this interface, you can also deploy and manage your models.
Thanks for this very nice workshop. Learned a lot!
Nice article keep it up like this in your future.I hope you do best afford and make future bright.